Do you want to learn how to migrate your WordPress website to Hostinger from Hostgator? In this post I will guide you how you can do the same step-by-step.
- Step-1 Book your hosting with Hostinger
- Step-2 Add your domain to Hostinger
- Step-3 Install a backup plugin on Hostgator site
- Step-4 Take local backup using on Hostgator
- Step-5 Setup fresh WordPress on Hostinger
- Step-6 Update Nameservers on Hostgator
- Step-7 Import Backup on new website
- Step-8 Update Permalinks on Hostinger
- Conclusion
Step-1 Book your hosting with Hostinger
Hostinger is a popular website hosting company that provides great services at very affordable prices, which makes it very popular for hosting low-traffic websites.
Here are the steps we need to take to book hosting and Domain with Hostinger for your website or blog:
1- Goto Hostinger website, If you are in India you can visit Hostinger India website. Then go to Web Hosting from the very top.
![How To Migrate Your Website To Hostinger From Hostgator in [year] 1 Hostinger-hosting-for-small-websites](https://ankitsharma.tv/assets/Hostinger-hosting-for-small-websites.jpg)
Note: You don’t have to choose WordPress Hosting, A normal shared web hosting will just work fine.
2- Choose your Best plan:
Now we need to choose a hosting plan. I would highly recommend going with “Premium Web Hosting” plans even if you have just 1 website to host. It’s a great value plan where you will get a better webspace, better speed and most importantly a FREE domain for 1st year.
It might not be relevant when you are migrating your already booked domain But still, the features are worth paying for.
Once you finalize your hosting plan, Just click on “Add to cart“
![How To Migrate Your Website To Hostinger From Hostgator in [year] 2 Web hosting plans from Hostinger](https://ankitsharma.tv/assets/Hostinger-webhosting-plans.jpg)
3- Choose your hosting plan term:
Now its time to choose the plan term. This is the best part about Hostinger Hosting service. You can choose multiple hosting payment terms. From 1 month to 3 years, you can buy hosting as per your budget or requirement.
Although I would recommend you to choose 48 month plan to get the best value. But if for any reason you can’t buy that, make sure you select at least 1 year plan because that’s the minimum requirement to get your Free domain.
![How To Migrate Your Website To Hostinger From Hostgator in [year] 3 Hostinger hosting plan price](https://ankitsharma.tv/assets/Hostinger-Hosting-plans-price.jpg)
4- Create an account and checkout
Once you select your hosting plan period our next step is to create an account. So make sure you enter a valid Email ID to create your account with Hostinger.
After that, select your payment mode. These modes may be different for your depending upon the location where you are paying from. So, Fill in all the details and proceed with the payment.
![How To Migrate Your Website To Hostinger From Hostgator in [year] 4 Hostinger-coupon-code](https://ankitsharma.tv/assets/Coupon-for-Hostinger.jpg)
Once the payment is done, You will get an email for account confirmation and after that you can login in your Hostinger hosting panel.
Step-2 Add your domain to Hostinger
In this step, we are going to add our domain (which we want to migrate to Hostinger) in our newly purchased hosting panel.
Once we have purchased our hosting plan. Its time to add our old domain in our Hostinger hosting panel. Here are the steps we need to follow.
1- login into your Hostinger account and goto >> “Websites” from the top menu and then click on “Create or Migrate a website“.
![How To Migrate Your Website To Hostinger From Hostgator in [year] 5 Adding new domain to Hostinger](https://ankitsharma.tv/assets/Adding-new-domain-to-hostinger.jpg)
2- After that we need to choose what type of website we need to create, So here we need to select Others.
![How To Migrate Your Website To Hostinger From Hostgator in [year] 6 Adding-new-domain-to-hostinger](https://ankitsharma.tv/assets/Adding-new-domain-to-hostinger-1.jpg)
3- On the next page, choose “Skip, create an empty website“
![How To Migrate Your Website To Hostinger From Hostgator in [year] 7 Adding new domain to hostinger 3](https://ankitsharma.tv/assets/Adding-new-domain-to-hostinger-3.jpg)
4- On the next screen choose “Use and existing domain” and then enter your domain (which we need to transfer) in the field below.
![How To Migrate Your Website To Hostinger From Hostgator in [year] 8 Adding new domain to hostinger account](https://ankitsharma.tv/assets/adding-new-domain-to-hostinger-4.jpg)
5- Now our domain is added to our new Hostinger Account and in the final step we just need to update the nameservers of our domain as given by Hostinger on our existing Hostgator server. We will do that in the next step.
![How To Migrate Your Website To Hostinger From Hostgator in [year] 9 Adding new image to hostinger account](https://ankitsharma.tv/assets/Adding-new-domain-to-hostinger-5.jpg)
But before we update the nameservers on Hostgator, we need to make sure we get all the files from our old hosting server, So for that, we need to take a backup of our old website from Hostgator.
6- Now we need to click on “Continue” and on the next page we need to choose “Manage Site” to access the control panel dashboard of our newly added domain.
![How To Migrate Your Website To Hostinger From Hostgator in [year] 10 adding new domain to hostinger 6](https://ankitsharma.tv/assets/adding-new-domain-to-hostinger-6.jpg)
Step-3 Install a backup plugin on Hostgator site
We are going to use the WPvivid backup plugin, in this case, to create a backup of site hosting on Hostgator and upload that on the new Hostinger server. But you can try any other backup plugin as well.
In order to install the WPvivid backup plugin, here are the steps we need to follow:
1- Goto plugins >> Add new and search for “WPVIVID“
![How To Migrate Your Website To Hostinger From Hostgator in [year] 11 install wpvivid backup plugin](https://ankitsharma.tv/assets/install-wpvivid-backup-plugin.jpg)
2- Click on Install now and then click on Activate.
Step-4 Take local backup using on Hostgator
In this step, we will be starting the process of taking back our website on the Hostgator server.
Once the plugin is installed, Now it’s time to take a local backup of our website and save it on our computer so that we can get a copy of all the files that we wish to move to our new server.
– Go to WpVivid Backup using the WordPress main navigation and then click on Backup Now.
Make sure it is selected on “Database + Files” and “Save Backup in Local“.
![How To Migrate Your Website To Hostinger From Hostgator in [year] 12 Local backup using WPvivid](https://ankitsharma.tv/assets/local-backup-using-wpvivid.jpg)
It’s going to take a new minute depending on your website size. Once it’s done, click on the Download link to save the backup file on your local computer.
![How To Migrate Your Website To Hostinger From Hostgator in [year] 13 download-backup-from-WPvivid](https://ankitsharma.tv/assets/download-backup-from-WPvivid.jpg)
Step-5 Setup fresh WordPress on Hostinger
We are going to use Hostinger’s in-built Auto Installer to install WordPress on our newly added domain.
In order to install a fresh copy of WordPress on our new Hostinger hosting account. Here are the steps we need to follow:
1- Goto “Websites” from the top menu and then click on “Manage” button on your recently added domain.
![How To Migrate Your Website To Hostinger From Hostgator in [year] 14 How to setup wordpress in Hostinger](https://ankitsharma.tv/assets/How-to-setup-wordpress-on-Hostinger.jpg)
2- Then from the left-hand side menu, choose “Websites” and then choose “Auto Installer“
![How To Migrate Your Website To Hostinger From Hostgator in [year] 15 How to set up WordPress on Hostigner](https://ankitsharma.tv/assets/How-to-set-up-wordpress-on-hostinger-2.jpg)
3- On the next page, Select WordPress for the options available.
![How To Migrate Your Website To Hostinger From Hostgator in [year] 16 How to setup WordPress on Hostinger](https://ankitsharma.tv/assets/How-to-setup-Wordpress-on-Hostinger-3.jpg)
4- On the next screen, Fill in all the details about your new WordPress setup and then click on “Next“.
![How To Migrate Your Website To Hostinger From Hostgator in [year] 17 how to setup WordPress on Hostinger](https://ankitsharma.tv/assets/how-to-setup-wordpress-on-hostinger-6.jpg)
5- Once the Installation is done, We land on the dashboard of the Hostinger website manager, which provides a lot of options for various things like live website link, daily backup, and website backend link, etc.
![How To Migrate Your Website To Hostinger From Hostgator in [year] 18 How to setup WordPress on Hostinger](https://ankitsharma.tv/assets/How-to-setup-WordPress-on-Hostinger-7.jpg)
Ensure you note the username and password in a safe place for future reference.
Step-6 Update Nameservers on Hostgator
To show our website to the public we need to update the nameservers on Hostgator to point to the new host i.e. Hostinger.
To update the nameservers on Hostgator, we need to log in to our Hostgator Hosting panel and then follow the steps below:
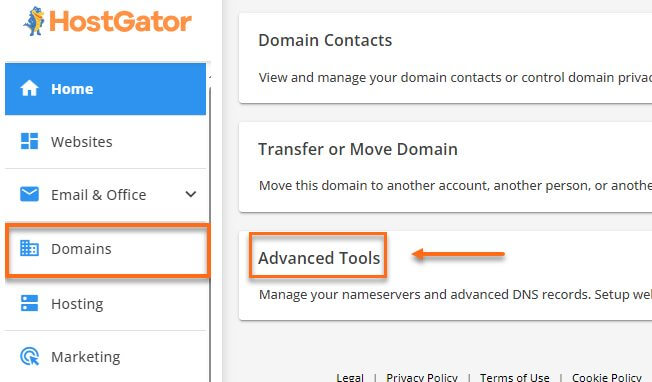
1- Login into the Hostgator account then go to “Domains” and then Scroll down to “Advanced Tools“

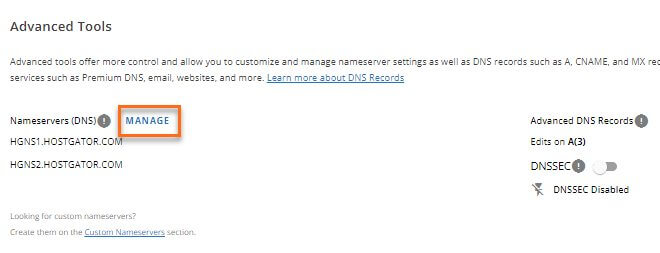
2- Then click on “Manage”

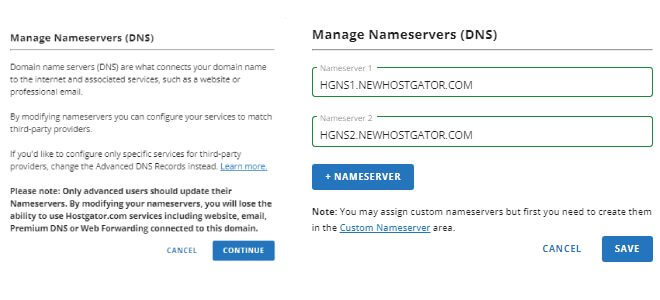
3- You will get a pop-up box, asking for your confirmation. So just click on proceed.

This is the point where we need to enter the nameservers from our new host i.e. Hostinger and then click on “save“.
Now wait for 10-15 minutes and after that our domain will start reflecting data from the new host, Which is right now just a fresh copy of Default WordPress frontend.
Once you see the default WordPress theme is now showing on the frontend. Its time to login in the backend and upload the backup.
Step-7 Import Backup on new website
We are going to upload the backup that we took in the step-3 from Hostgator using WPVivid plugin to restore our website with old content and designer
In order to upload the backup file, here are the steps we need to follow:
1- Login to the newly installed WordPress setup and goto “WPvivid Backup” and then click on “Upload“
![How To Migrate Your Website To Hostinger From Hostgator in [year] 19 How to upload backup on WordPress](https://ankitsharma.tv/assets/how-to-upload-backup-on-Wordpress.jpg)
2- Then, select the back up file that we have downloaded as shown in step-3. Or just drop the backup file over the “Select Files” button.
3- Once the file is uploaded click on the Upload button to start the upload process.
4- Once the upload is complete we will see our backup copy in the “Backups” tab from where we can now restore it on our website.
5- Now we need to click on the “Restore” button to start the backup restoration process.
![How To Migrate Your Website To Hostinger From Hostgator in [year] 20 How to restore WordPress backup using WPvivid](https://ankitsharma.tv/assets/how-to-restore-backup-on-wordpress.jpg)
6- On the next page we need to click on “Restore” again and then it will take a few minutes to start the restoration process.
![How To Migrate Your Website To Hostinger From Hostgator in [year] 21 How to restore WordPress website backup](https://ankitsharma.tv/assets/how-to-restore-wordpress-from-backup-6.jpg)
7- Once the backup restoration is complete, We will be logged out from the WordPress admin panel and we need to login again.
At this point we need to use our Original Admin details that we have used on our previous hosting server (if you have not changed it while installing a new WordPress copy).
Step-8 Update Permalinks on Hostinger
It’s time to make sure all the links are working fine on our new Hostinger host.
Once we login back, Its time to check if everything is working fine or not. For that we need to make sure that we update our permalinks links.
So for that, we need to goto “Settings” and then click on “Permalinks“.
![How To Migrate Your Website To Hostinger From Hostgator in [year] 22 update permanent links on WordPress](https://ankitsharma.tv/assets/Update-wordpress-permanent-links.jpg)
And then choose the type of permalinks structure we wish to have. I prefer the one mentioned in the image below.
![How To Migrate Your Website To Hostinger From Hostgator in [year] 23 Update permanent links to WordPress.](https://ankitsharma.tv/assets/update-permanent-links-for-WordPress-2.jpg)
Once we select the permalinks structure, we just need to click on “Save Changes” and then we are Done.
Conclusion
So this is how we migrate our website from Hostgator to Hostinger hosting service. If you are planning to migrate your website to Hostinger then make sure you check out the special coupon code below.
