In this post, I will walk you through the step-by-step process of creating a WordPress website for Restaurant in 2026 using Free themes and plugins.
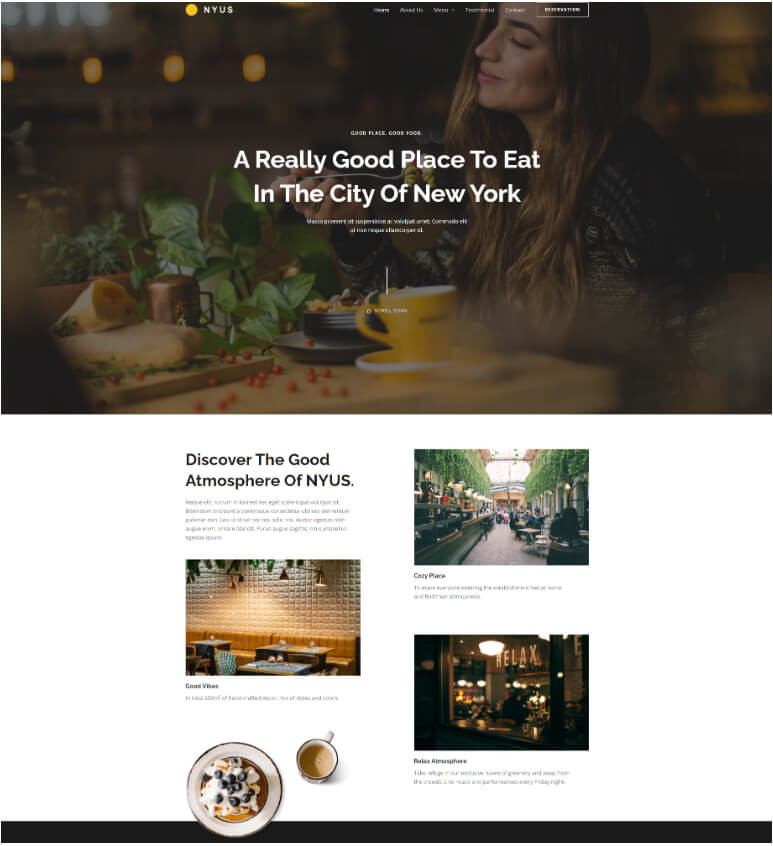
So if you want to start your online Restaurant business or you already have an offline business that you wish to take online then this is the exact guide you need to follow to create your Restaurant business website in 2026
So, here are the steps that we need to take to create a Restaurant website.
- Step-1 Book Hosting for Restaurant Website
- Step-2 Get Free Domain for your website
- Step-4 Install WordPress
- Step-5 Install theme for Restaurant Website
- Step-6 Install Required plugins
- Step-7 Create Layout for website
- Step-8 Create Inner Pages
- Step-9 Create content using AI
- Faq's About how to build a WordPress website For Restaurant
- Get this website for FREE !!
Step-1 Book Hosting for Restaurant Website
Hostinger is a popular website hosting company that provides great services at very affordable prices, which makes it very popular for hosting a Restaurant website.
Here are the steps we need to take to book a hosting with Hostinger:
1- Goto Hostinger website, If you are in India you can visit Hostinger India website. Then go to Web Hosting from the very top.
![How To Make A WordPress Website For Restaurant in [year] 1 Hostinger hosting for small websites](https://ankitsharma.tv/assets/Hostinger-hosting-for-small-websites.jpg)
Note: You don’t have to choose WordPress Hosting, A normal shared web hosting will just work fine.
2- Choose your Best plan:
Now we need to choose a hosting plan. I would highly recommend you choose as per your needs and budget. The price plans might change when you visit the site
But make sure you choose a plan that offers at least Free domain with Free SSL certificate.
Once you finalize your hosting plan, Just click on “Add to cart“
![How To Make A WordPress Website For Restaurant in [year] 2 Web hosting plans from Hostinger](https://ankitsharma.tv/assets/Hostinger-webhosting-plans.jpg)
3- Choose your hosting plan term:
Now its time to choose the plan term. This is the best part about Hostinger Hosting service. You can choose multiple hosting payment terms. From 1 month to 48 months, you can buy hosting as per your budget or requirement.
Although I would recommend you to choose at least 12 months plan to get the best value and a free domain for first year.
Note: Just in case you cancel your hosting within 30 days, you get full refund. But it will not refund your domain purchasing cost. Once you buy a domain, it’ s now locked for at-least one year.
![How To Make A WordPress Website For Restaurant in [year] 3 Hostinger Hosting plans price](https://ankitsharma.tv/assets/Hostinger-Hosting-plans-price.jpg)
4- Create an account and checkout
Once you select your hosting plan period our next step is to create an account. So make sure you enter a valid Email ID to create your account with Hostinger.
After that, select your payment mode. These modes may be different for your depending upon the location where you are paying from. So, Fill in all the details and proceed with the payment.
![How To Make A WordPress Website For Restaurant in [year] 4 Hostinger-coupon-code](https://ankitsharma.tv/assets/Coupon-for-Hostinger.jpg)
Once the payment is done, You will get an email for account confirmation and after that you can login in your Hostinger hosting panel.
Step-2 Get Free Domain for your website
In this step, we will claim our free domain for our Restaurant website as per our Hostinger plan.
Once you make the payment you will be redirected to a page like this as below. Now Once you click on the “Start” button it will start the onboarding process.
But let me show you everything from scratch, So we will not start this wizard but will click on the Hostinger Logo on the top.
![How To Make A WordPress Website For Restaurant in [year] 5 Book free domain on Hostinger](https://ankitsharma.tv/assets/book-free-domain-hostinger-1.jpg)
This will take you to the Dashboard of your Hostinger hosting account and from here. We will first claim our Free domain and then set up our hosting account.
So let’s first click on the button “Claim domain”
![How To Make A WordPress Website For Restaurant in [year] 6 Book free domain on Hostinger](https://ankitsharma.tv/assets/book-free-domain-hostinger-2.jpg)
You will see a pop-up where you can enter the domain name that you wish to book for your business website. Make sure you choose .com as the domain extension. If .com is not available then try with some extensions.
And one you finalize the domain then just click on “Claim domain“.
![How To Make A WordPress Website For Restaurant in [year] 7 Book free domain on Hostinger](https://ankitsharma.tv/assets/book-free-domain-hostinger-3.jpg)
In the end, you just need to fill up some basic contact information as the domain owner and you are done.
It might ask you to choose a hosting plan but you can skip that part because we will do that from scratch in the next step.
Step-4 Install WordPress
We are going to use Hostinger’s in-built Auto Installer to install WordPress on our newly added domain for our Restaurant website
In order to install a fresh copy of WordPress on our new Hostinger hosting account. Here are the steps we need to follow:
1- Goto “Websites” from the top menu and then click on “Manage” button on your recently added domain.
![How To Make A WordPress Website For Restaurant in [year] 8 How to setup wordpress in Hostinger](https://ankitsharma.tv/assets/How-to-setup-wordpress-on-Hostinger.jpg)
2- Then from the left-hand side menu, choose “Websites” and then choose “Auto Installer“
![How To Make A WordPress Website For Restaurant in [year] 9 How to set up WordPress on Hostigner](https://ankitsharma.tv/assets/How-to-set-up-wordpress-on-hostinger-2.jpg)
3- On the next page, Select WordPress for the options available.
![How To Make A WordPress Website For Restaurant in [year] 10 How to setup WordPress on Hostinger](https://ankitsharma.tv/assets/How-to-setup-Wordpress-on-Hostinger-3.jpg)
4- On the next screen, Fill in all the details about your new WordPress setup and then click on “Next“.
![How To Make A WordPress Website For Restaurant in [year] 11 how to setup WordPress on Hostinger](https://ankitsharma.tv/assets/how-to-setup-wordpress-on-hostinger-6.jpg)
5- Once the Installation is done, We land on the dashboard of the Hostinger website manager, which provides a lot of options for various things like live website link, daily backup, and website backend link, etc.
![How To Make A WordPress Website For Restaurant in [year] 12 How to setup WordPress on Hostinger](https://ankitsharma.tv/assets/How-to-setup-WordPress-on-Hostinger-7.jpg)
Ensure you note the username and password in a safe place for future reference.
Step-5 Install theme for Restaurant Website
We highly recommend using the ASTRA theme for the Restaurant website. Using this theme you can do any customization you wish along with some amazing performance.
To install a theme on our WordPress website, first, we need to login into the admin area of our website. For that, we need to visit <yourwebsite.com>/wp-admin/ and then enter the username and password as created in the previous step.
After that, these are the steps we need to follow in our WordPress admin area:
1- Go to “Appearance” and then click on “Themes“.
![How To Make A WordPress Website For Restaurant in [year] 13 Install WordPress on Hostinger](https://ankitsharma.tv/assets/install-wordpress-on-hostinger-1.jpg)
2- Click “Add New Theme” from the top and then search for “ASTRA“. Chances are you don’t have to search for it, ASTRA theme will appear in the top 4 themes in the WordPress theme library.
3- To install the theme, Just click on “Install” and then click on “Activate“.
![How To Make A WordPress Website For Restaurant in [year] 14 Install WordPress on Hostinger](https://ankitsharma.tv/assets/install-wordpress-on-hostinger-2.jpg)
Step-6 Install Required plugins
We are going to install Free plugins only to create this entire Restaurant website. Using these plugins we can create any kind of blog or website.
1- First goto “Plugins” and then click on “Add New“
![How To Make A WordPress Website For Restaurant in [year] 15 install-new-plugin-wordpress](https://ankitsharma.tv/wp-content/uploads/2024/01/install-new-plugin-wordpress.png)
2- Then search for “Spectra“. This plugin will help us create some amazing-looking web page layouts by using the Block editor.
To install this plugin, click on Install Now and then click on “Activate“
![How To Make A WordPress Website For Restaurant in [year] 16 Install-Spectra-plugin-Astra](https://ankitsharma.tv/wp-content/uploads/2024/01/Install-Spectra-plugin-Astra.png)
3- After this, the next plugin we need to install is “Starter Templates“. So for that, we need to follow the same process. Search the plugin and then Install and then Activate the plugin.
![How To Make A WordPress Website For Restaurant in [year] 17 Install-Starter-Templates-Astra](https://ankitsharma.tv/wp-content/uploads/2024/01/Install-Starter-Templates-Astra-1024x538.png)
And that’s it, These are the two basic plugins that we need to create our website.
After that, these are the steps we need to follow in our WordPress admin area:
Step-7 Create Layout for website
We are going to use starter template library to import the Restaurant website template to get our website live in no time.
To create our Restaurant website layout. We are going to use the Starter template library from Astra theme itself. So that we don’t have to design everything from the ground up.
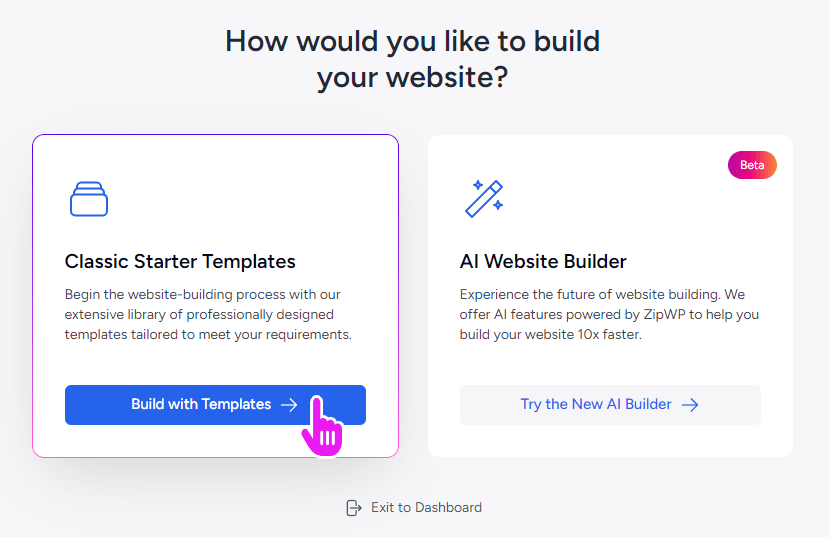
1- As soon as we Activate our Starter Template plugin, We can choose how we wish to generate our website—either using Readymade templates or AI.
For this case, we are going to click on “Classic Starter Templates”
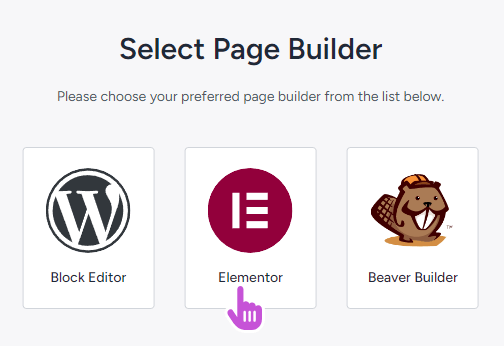
2- On the next screen we need to choose, Which page builder we wish to use for creating our Restaurant website. So for this, we are going to use the most popular Elementor page builder.
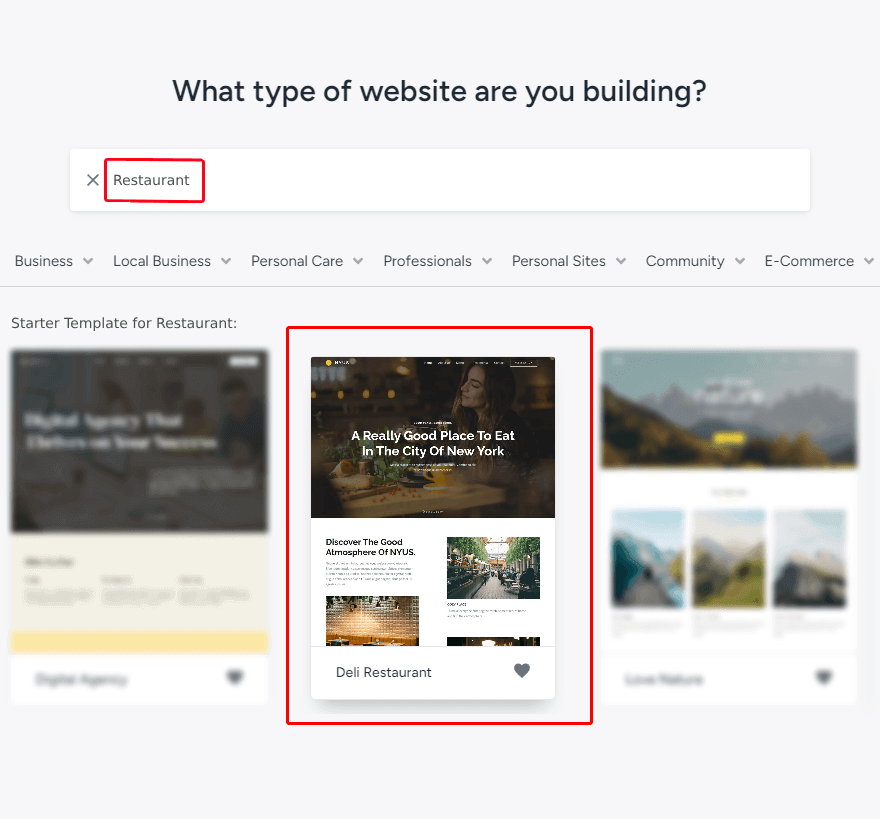
3- Now we need to search for the template that we wish to choose for our Restaurant website. Here is an example below. You can check other templates as well and see which one looks best for your needs.
Once the template is finalized, just click on the template and proceed to the next screen.
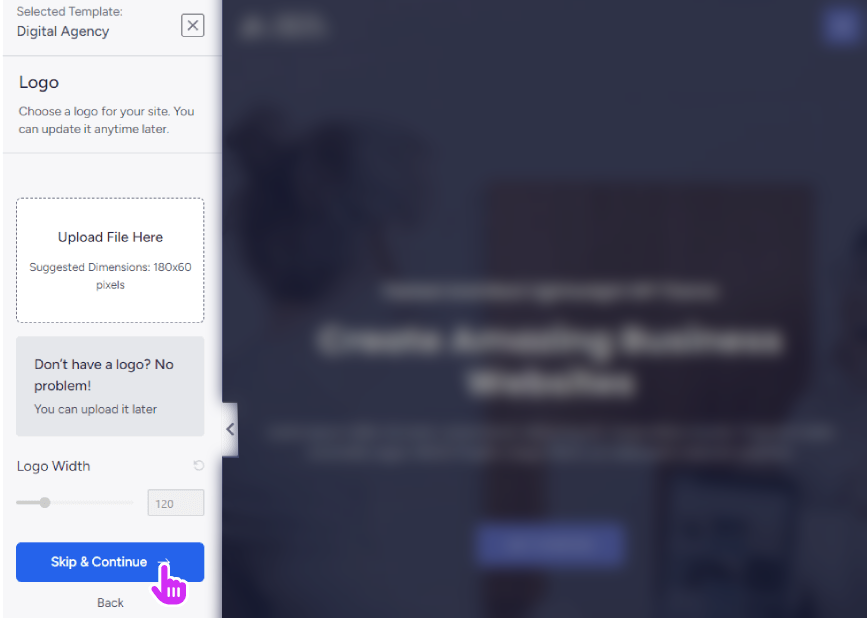
4- On the next screen we get an option to upload our brand logo and see how it looks on the template. We can also do that later on once we import the template so we can click on “Skip & Continue“
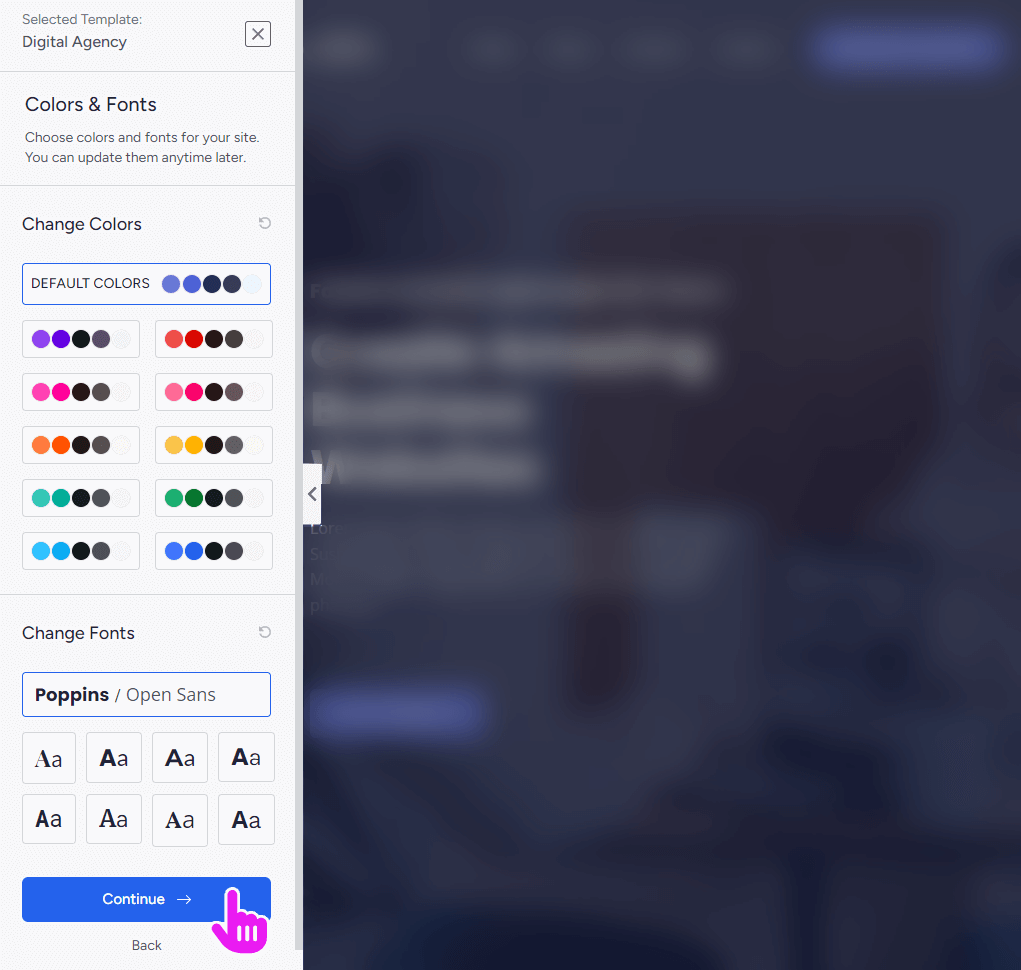
5- On the next screen we get an option to edit the global colors and global fonts for our template. Once again that also we can do later on, once we import the template.
If you know what colors or fonts you wish to change, You can do it right here as well.
6- On the next screen we get the final details to confirm before importing the template. Most of them are straightforward so you can proceed as per your requirement.
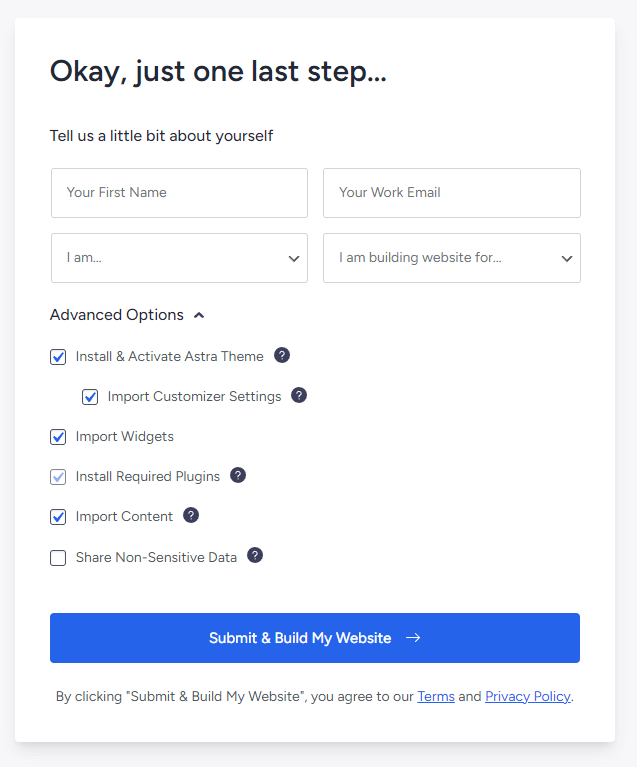
7- After this step, it will take a few seconds to import the template and our Restaurant website will be ready to use.
We can now do all the customizations after login in the WordPress back end using the link <yourwebsite.com>/wp-admin/
Step-8 Create Inner Pages
Apart from sample inner pages on our Restaurant website template, if we wish to create a new page we can do that using the following steps.
Now let’s say we wish to create ABOUT US page for our Restaurant website. Now let’s see how we can do that.
1- From “Pages“, click on “Add New Page“
![How To Make A WordPress Website For Restaurant in [year] 18 Add-new-page-astra](https://ankitsharma.tv/wp-content/uploads/2024/01/Add-new-page-astra-1024x585.png)
2- Lets name the page as “About Us” and now in order to create or design this page. We are going to use “Template Kit” option from the top left corner.
![How To Make A WordPress Website For Restaurant in [year] 19 using-starter-template-astra](https://ankitsharma.tv/wp-content/uploads/2024/01/using-starter-template-astra-1024x494.png)
3- From this “Template Kit” We can choose the type of pattern/content we wish to import into our page. We can choose the variety of block editor patterns available in different categories.
The best part is all of these patterns are already using our theme’s global color pallet and typography.
![How To Make A WordPress Website For Restaurant in [year] 20 design-library-Astra](https://ankitsharma.tv/wp-content/uploads/2024/01/design-library-Astra-1024x746.png)
4-To add/insert any pattern on the page, just click on “insert” and the pattern will be added on the page.
Step-9 Create content using AI
We are going to use the power of AI to generate content for our Restaurant website. For that, we are going to use a powerful and Free tool.
In the previous step, while importing the pattern, the content we imported was generic. Instead of that, we can import the same pattern with content generated using AI, specific to our website.
1- From the same “Template Kit” popup, this time click on the gear icon and select “Personalized Library“.
![How To Make A WordPress Website For Restaurant in [year] 21 Astra-starter-template-ai](https://ankitsharma.tv/wp-content/uploads/2024/01/Astra-starter-template-ai.png)
2- This will start the process of connecting our website to the ZipWP AI platform. It may ask you to create a free account on the Zipwp platform during this process.
![How To Make A WordPress Website For Restaurant in [year] 22 starter-template-Astra-with-AI](https://ankitsharma.tv/wp-content/uploads/2024/01/starter-template-Astra-with-AI-1024x594.png)
This is the same process that we need to follow while creating a website using Zipwp AI. Now it’s going to take few steps to understand our website to fill the content in various pattern templates tailored for our website.
3- Once the process is complete, this is how we get the new updated patterns with custom-tailored content for our website.
![How To Make A WordPress Website For Restaurant in [year] 23 Starter-template-astra-ai](https://ankitsharma.tv/wp-content/uploads/2024/01/Starter-template-astra-ai-2-1024x594.png)
Now, We can use this AI-generated content and pattern to create our website’s inner pages and various other sections.
Faq’s About how to build a WordPress website For Restaurant
Get this website for FREE !!
Yes, You heard it right. I will set up this exact website for you for Free.
The process is simple, You buy the Hosting, or Theme, or domain that you anyway need to buy for creating your website using my affiliate links below and I will set up your website Free of cost. So, It’s a Win-Win for both. So here are the steps.
Step-1: Buy Hosting, Theme, or domain from the links below to create your website.
Step-2: Copy the order email and send it to me using the form below.
Step-3: I will reply with the request to share the hosting details.
Step-4: Will do the setup for you in the next 36-48 hrs.
BOOK HOSTING
🠞 Hostinger: https://ankitsharma.tv/hostinger
Extra 7% OFF on Hostinger Hosting – Use Code – ANKITSHARMATV
🠞Namehero: https://ankitsharma.tv/namehero
🠞Cloudways: https://ankitsharma.tv/cloudways
BOOK PRO THEMES
🠞 ASTRA: https://ankitsharma.tv/astra
🠞 KADENCE: https://ankitsharma.tv/kadence
🠞 BLOCKSY: https://ankitsharma.tv/blocksy
🠞 ELEMENTOR: https://ankitsharma.tv/elementor
🠞 POSIMYTH: https://ankitsharma.tv/posimyth
![How To Make A Free Real Estate Website Using WordPress in [year] 24 make-website-for-Marketing-Agency](https://ankitsharma.tv/wp-content/uploads/2024/03/make-website-for-Marketing-Agency-f-1024x576.png)